|
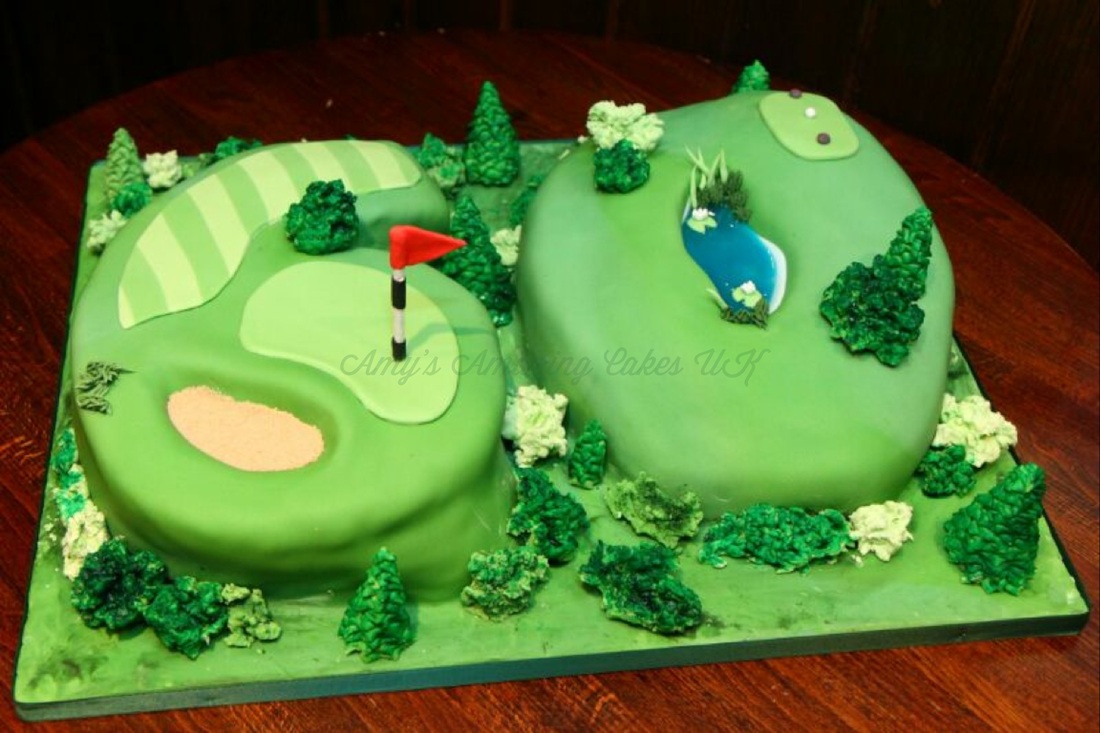
I have recently had the pleasure of making some golf themed cakes for some 60th birthdays. Both were a challenge for completely different reasons! The first was for a man and we decided on a 60 shaped golf course cake. This cake involved a hell of a lot of fondant icing! The big challenge was the lake which i made using homemade piping gel - very pleased with myself! The tress and bushes were all modelling paste and the bunker was soft brown sugar.
The second cake was slightly more abstract - the brief: Lady golfer on the top tier with her head in a bush looking for a golf ball meanwhile the bottom tier needs to have a boat on it churning out the birthday message in it's wake. Oh and a squirrel somewhere holding the lost golf ball.... Here's how it turned out: 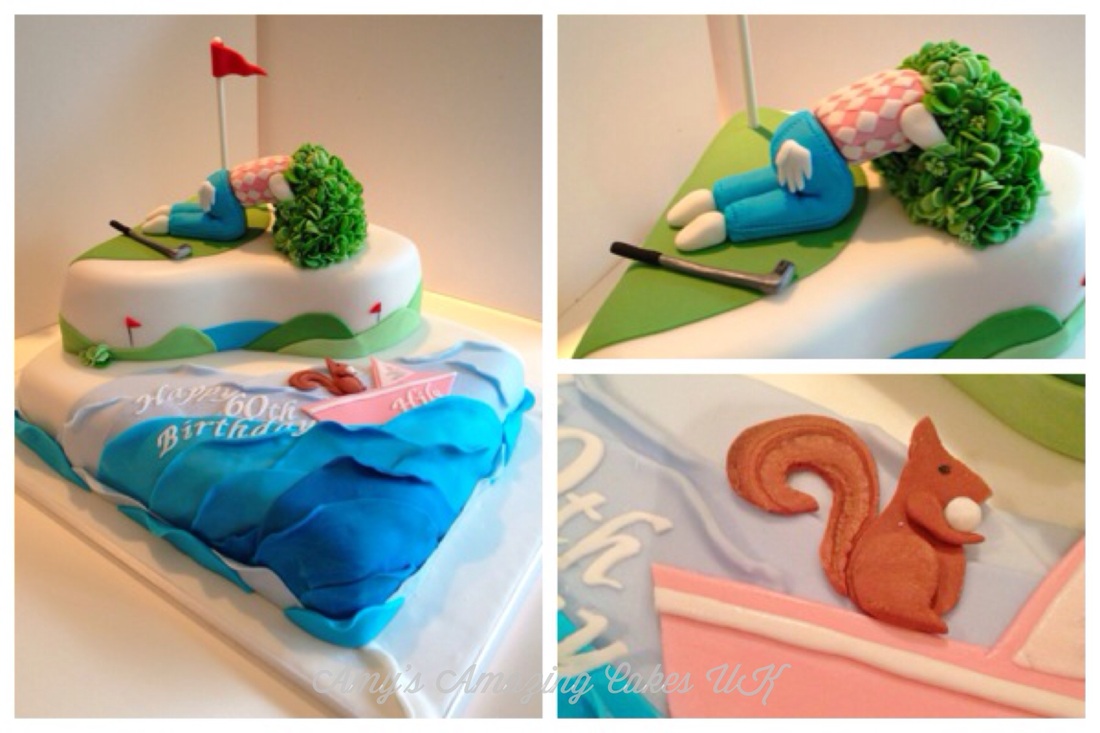 Much better than I expected. And yes, the squirrel just had to be driving the boat...
1 Comment
I watched the Great British Bake off final last night and I have to say generally I was disappointed. I know it is timed and the pressure must be immense but seriously, would any of you been happy with those wedding cake offerings? Don’t even get me started on Ruby’s show stopper but she did produce a gorgeous picnic basketwork on her picnic pie. The less said about Kimberley the better... Frances bakes have consistently looked amazing and her concepts took her work beyond food and entering art. So the result pleased me but even her wedding cake looked like it was about to topple over and crush any woodland animals who we scurrying around the log base. A worthy winner but next year I hope we see some grand show shoppers worthy of the final three. 
Frances Quin - Winner of Great British Bake Off 2013 (Photo BBC)
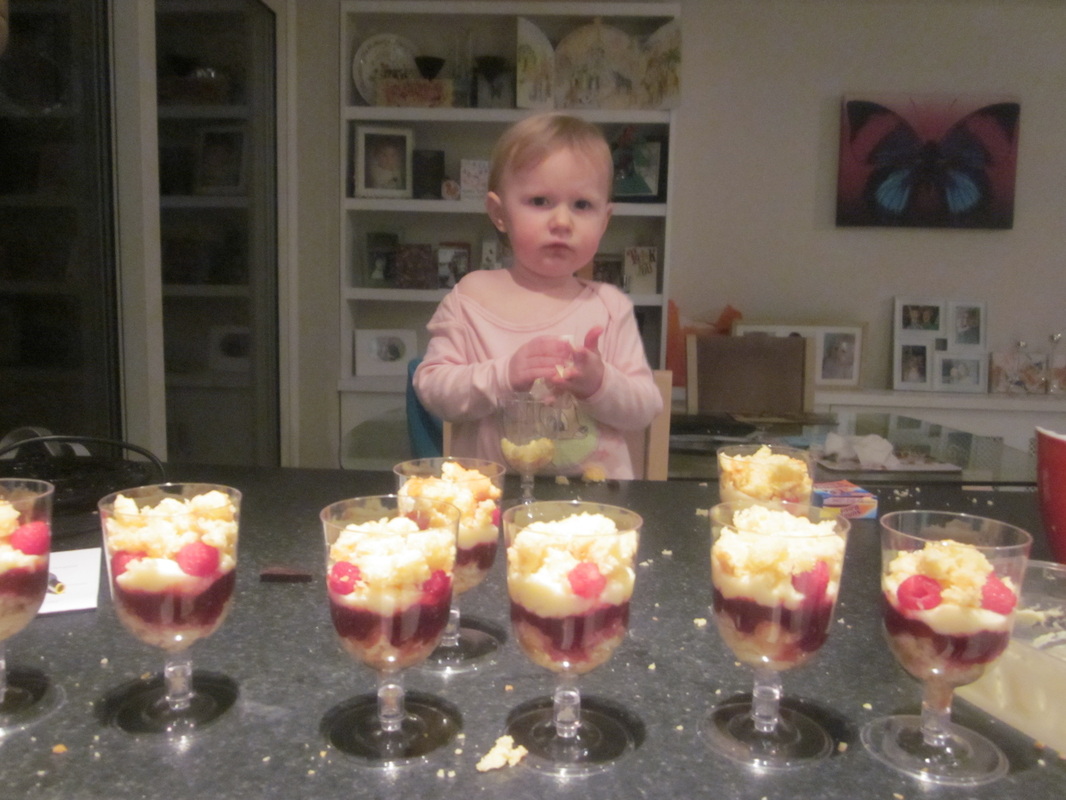
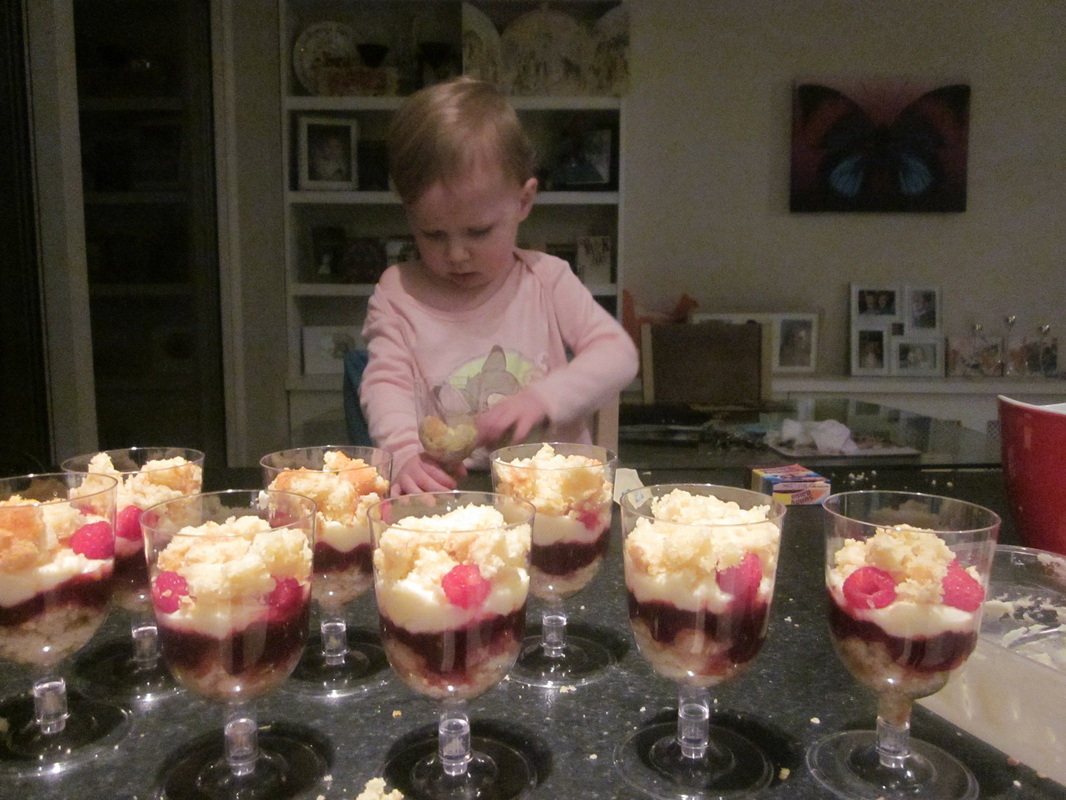
This post is somewhat belated but my little girl Eloise, who makes frequent guest appearances on this blog, turned 2 at the end of February. I know what you are all thinking, i look way too young to have a 2 year old (cough, cough) but it is true. Now Eloise has a lot of favourite things. Her favourite movies are The Lion King, Monsters Inc and Beauty and the Beast. Her favourite cartoons are Scooby Doo, Peppa Pig and Tom & Jerry. Her favourite books are Winnie the Pooh, Chocolate Moose for Greedy Goose and The Bravest Ever Bear. But one if her all time favourite things is Hello Kitty. She has everything Hello Kitty from her little table and chairs to pyjamas. So it had to be Hello Kitty. Plus it is pink which pleases me. 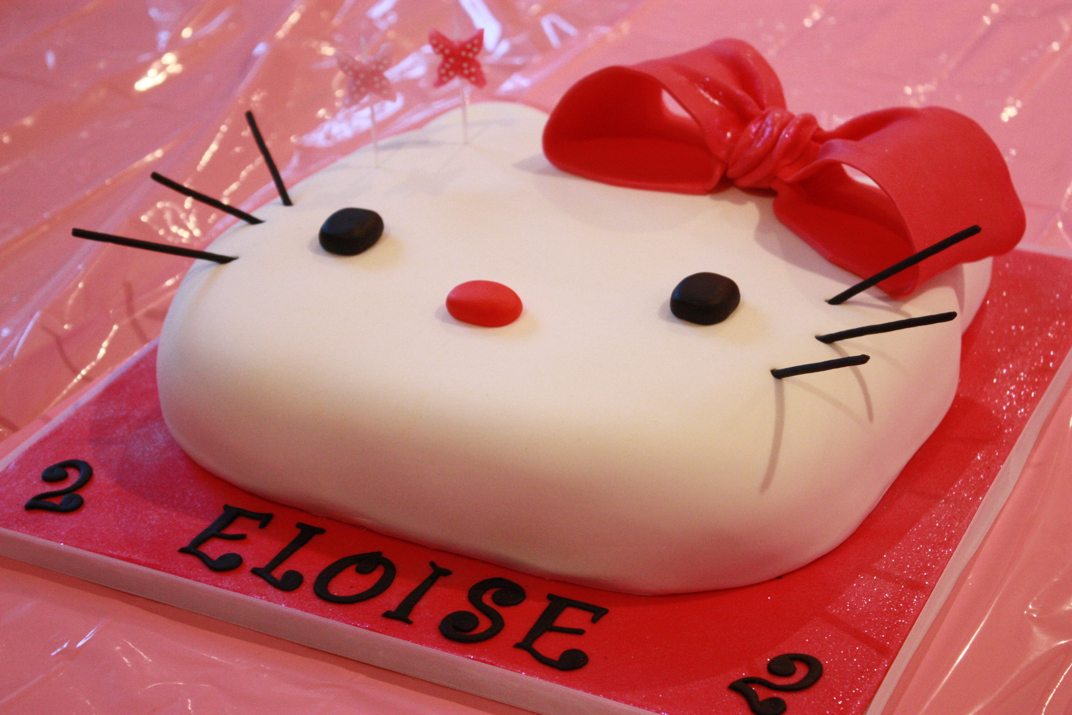 Hello Kitty birthday cake You'll see in my gallery i have made a few Hello Kitty cakes but i think the simplist and most effective is the face cake. The cake was lemon which is Eloise's favourite and i sculpted it from a 12'' square. The key is to make sure the edges are slightly rounded and the ears are a little lower than the rest of the cake. I use a slightly thicker icing to make sure i get a smooth finish. This cake needed to be extra special so i made a 3D bow out of modeling paste and left it to dry overnight before adding to the cake. The final touch was black icing whiskers which i made using flower paste and my special icing press. The detail could just as easily have been achieved with thin chocolate sticks (such as the box of matchmakers i had on standy) 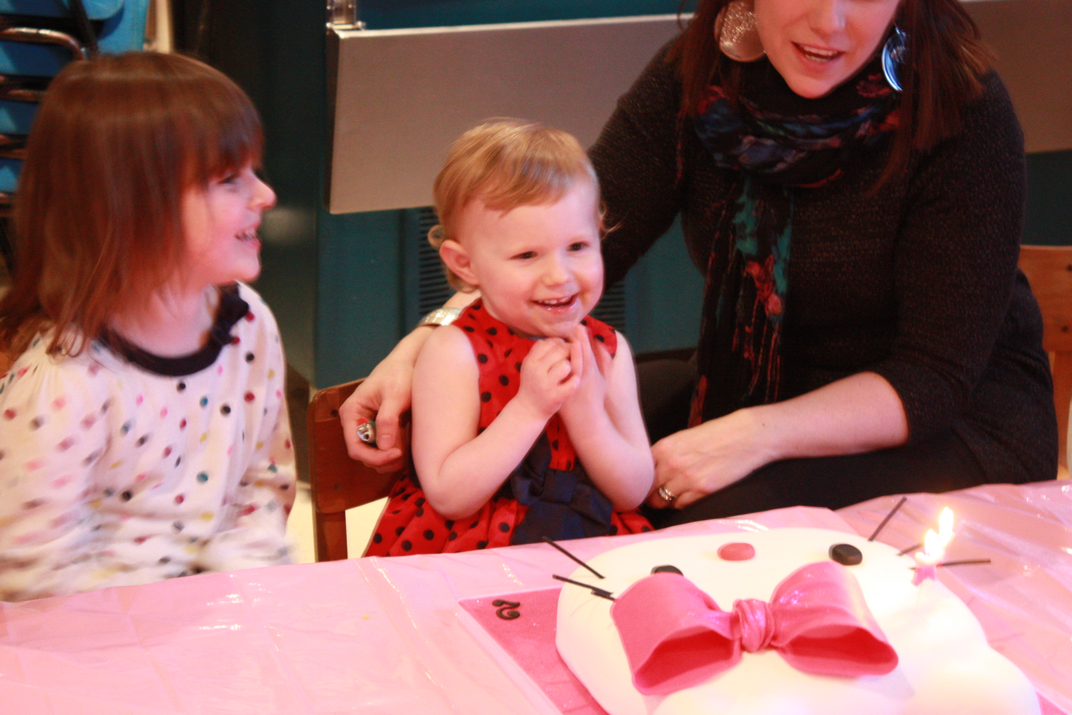 Look at that face! Eloise was beyond excited about her cake and enjoyed blowing out the butterfly candles twice! 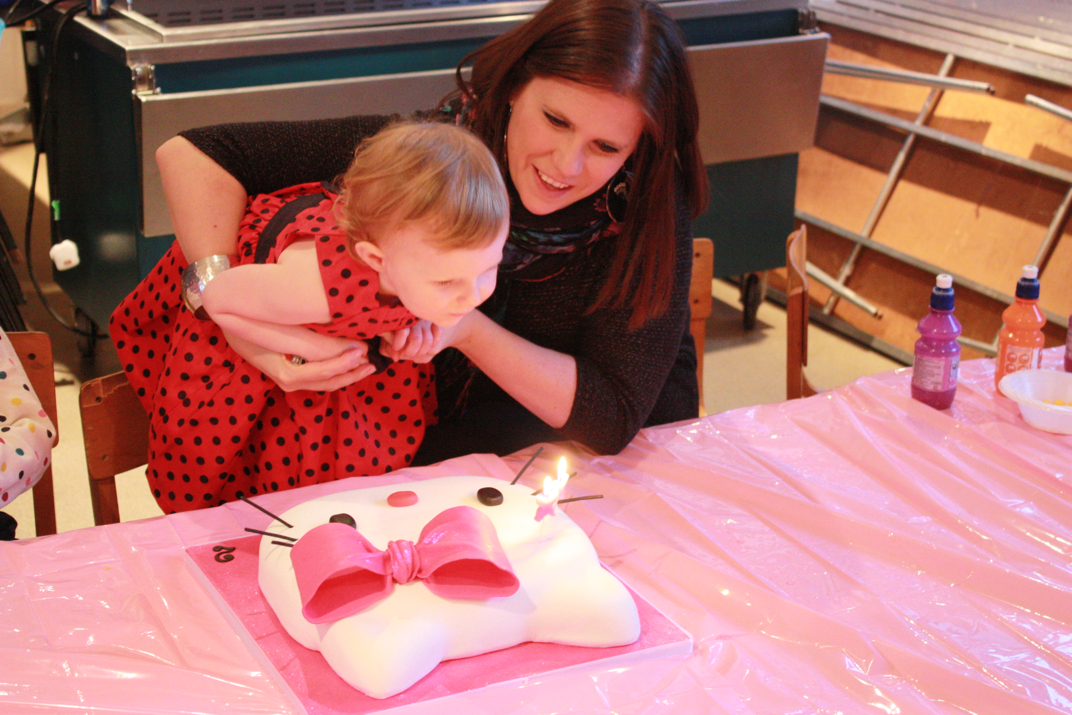 Blow! Here she is relaxing whilst enjoying her cake on the soft play equipment! Now to start planning next year... Life size Simba maybe?... 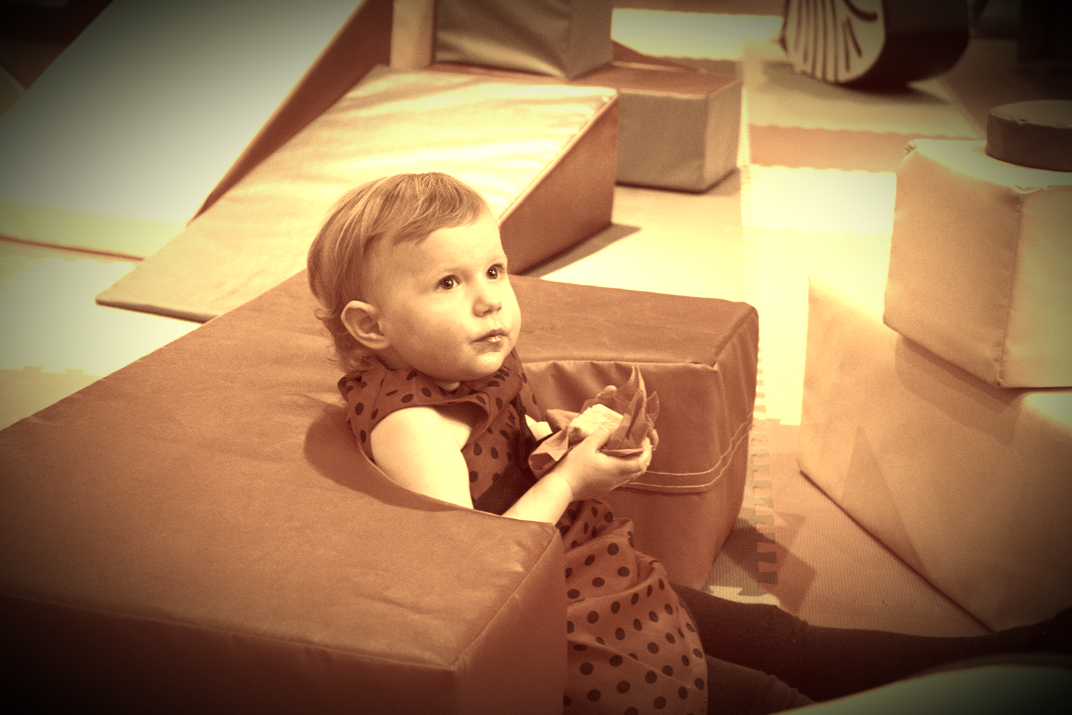 Yum yum! Before i start this post i shall hold my hands up and admit i haven't shared Eloise's second birthday cake with you all yet. Terrible of me as it was 2 months ago now but i promise to this week. In the meantime it was Eloise's BFF Ben's second burthday last weekend. You may remember his mum Laura (my BFF) and I made Ben's first birthday cake together. This year Laura flew solo and made Ben a cake representing his favourite storybook character The Gruffalo; 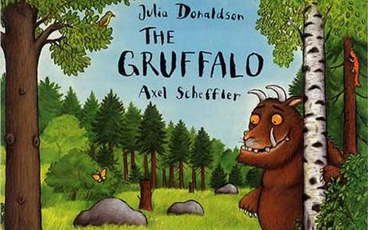 For those of you not familiar with The Gruffalo it is a very popular childrens book. The main character is a little mouse who during a walk through a forest encounters dangerous animals who all intend to eat him. The mouse invents a character called The Gruffalo to scare off the predators. Imagine the mouse's surprise when he stumbles on a real Gruffalo! To avoid being eaten by the Gruffalo the mouse claims to be the scariest creature in the forest. To prove it he walks back through the jungle with the Gruffalo and all the animals he met along the way run away and the Gruffalo believes the mouse really is the most feared creature in the forest and doesn't eat them. So it is a childrens book about cunning and deceit (and how not to get eaten). Laura wanted to make a cake which represented the Gruffalo himself but the design was tricky. She didn't want to fall into the trap of ending up with a sloppy brown mess (there are a few pretty shocking Gruffalo cakes found on Google search, hopefully they are homemade not professional disasters but if they are i'll leave it to Cake Wrecks blog to publically shame them) The best thing to do was to simplify the design down to a few key features which would instantly be recognisable as the Gruffalo without being too fussy or complicated. Laura decided to make a brown cake and add on the big orange eyes, hairy eyebrows, big ears and horns. She then used food colouring to detail around the eye area. Finally she covered the board in green fondant to represent the forest. 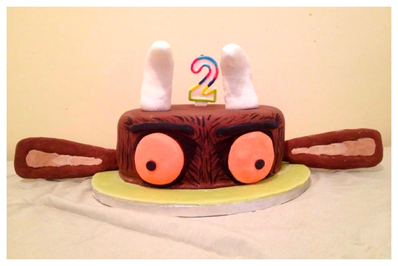 I was very impressed with Laura's fondant finish covering the cake. It was only her second cake and she didn't even need to ribbon the bottom of the cake as it was so neat. The modelling also was very effective and Ben instantly recognised his cake as a Gruffalo! Despite a false start with a silicone baking tray disaster (mental note not to try turning out until cake completely cool) the chocolate cake inside was deliciously moist and tasty. Happy Birthday Ben and well done Laura! 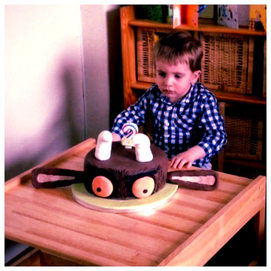 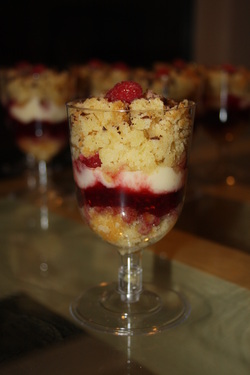 A few weeks back you may have read my post featuring the new craze taking the US by storm... cake cups. I decided to have a go at them myself for a friend's birthday using leftover lemon cake, vanilla buttercream icing, fresh raspberries and raspberry jam. Funnily enough i didn't have any spare whiskey glasses hanging about so, being the classy gal I am, I decided to use plastic wine glasses. I crumbled the sponge and added a layer to the bottom of the glass then added a layer of raspberry jam followed by a layer of buttercream and some fresh raspberries. I then sprinkled another layer of crumbled cake on top and finished it with a fresh raspberry and some grated dark chocolate. The result looked a lot better than i expected and the layers looked very appealing.
The novelty of the wine cups was very well received by the tasters (my trusty work colleagues!) and the general feedback was the ratio of filling to sponge was much better than a normal muffin/cupcake where you struggle to get cake and filling every bite. They were also a big hit with Eloise who got involved and made her own version which looked slightly different to mine but just as fun. The jury is still out over the cake/dessert classification... 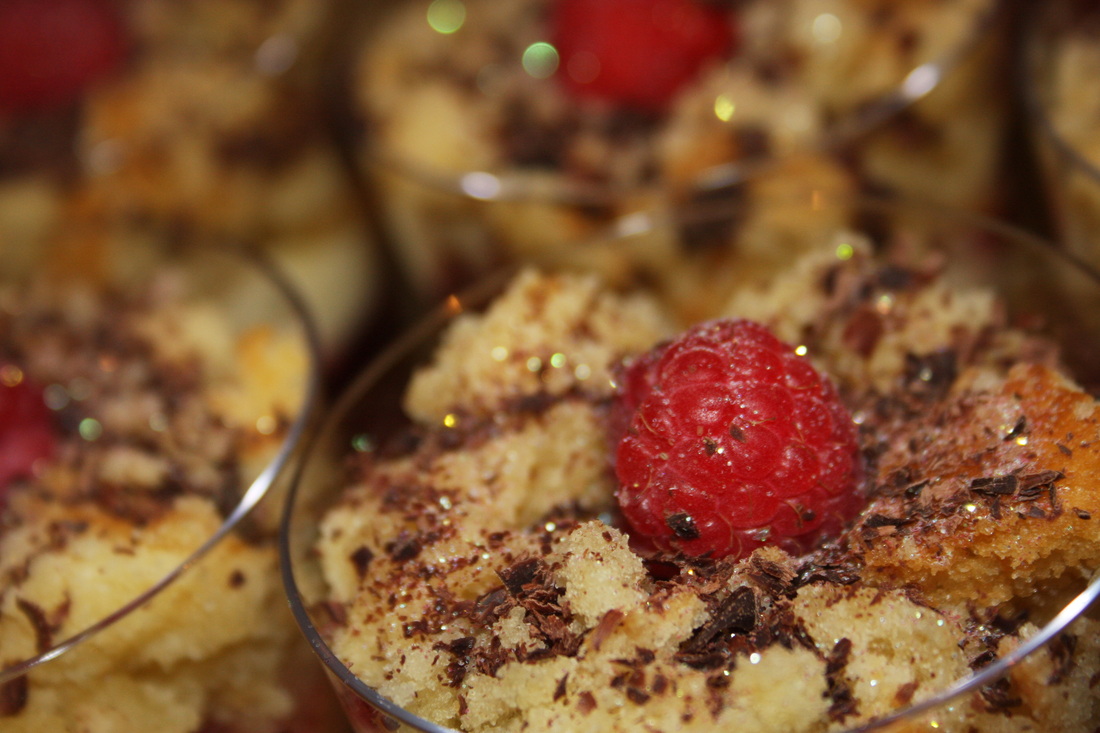 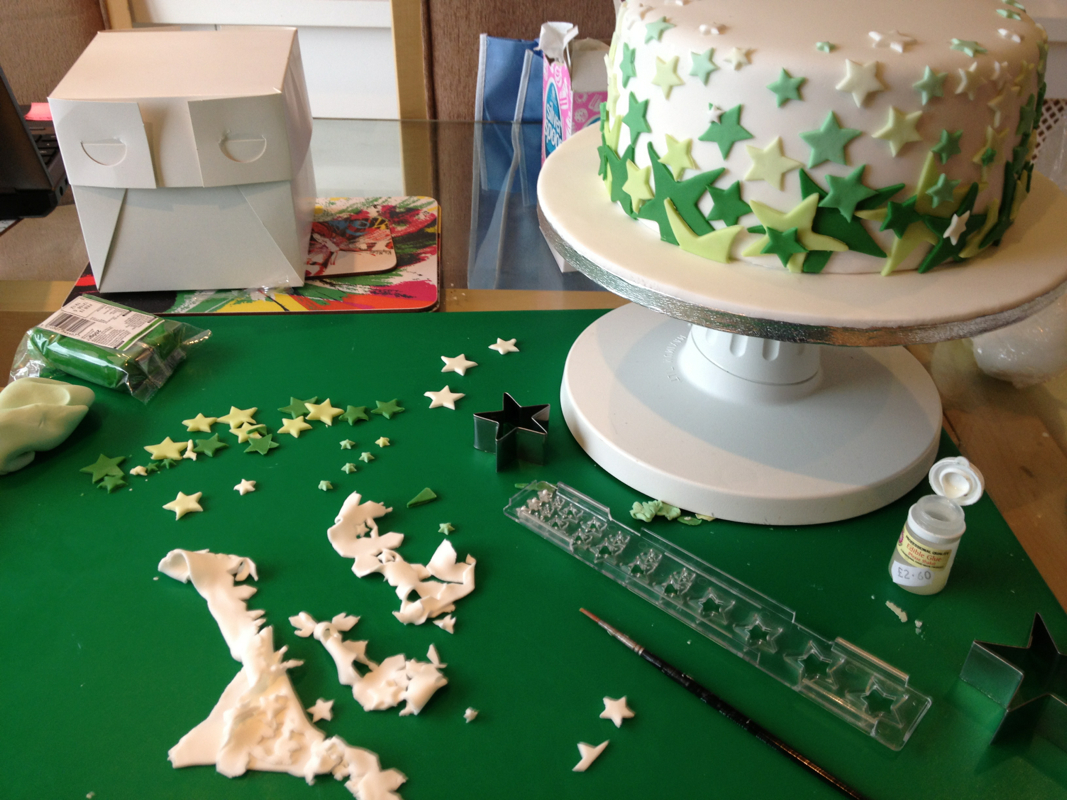 I thought I would share this snap of my workstation during cake decorating.
I use this large green non stick board to roll out my icing. It is an expensive tool but invaluable. You can get smaller sizes but for rolling out large pieces this is the best size. I have my cake up on a turntable so I can continually move it around to see it from all angles. This means there is less chance of dropping the cake! I mixed up a variety of green sugar paste to decorate this cake and I keep the different colours wrapped in plastic so they don't dry out as I am working. I roll the icing out using a little trex vegetable fat. This makes it easier to roll without loosing the vibrancy of he colour which happens when using icing sugar. I used star shaped cutters on this cake and stuck them onto the cake using edible glue. And finally hiding in the box at the back is the cake topper I made earlier! I keep them boxed up so that I don't damage them whilst making the rest of the cake. I should point out I am only sharing this picture as i was having a tidy moment and thought I should capture it on camera! Usually my kitchen it a sea of madness with a pristine cake in the middle! I thought I would share some pics of my latest cake which was for a friend's dad's 66th birthday. The brief was to model her dad, Frank, seated in his recliner chair wearing a suit and gold slippers. Being Irish the colour scheme had to be green! The topper was the biggest challenge as I don't often make character cakes. I mixed fondant with flowerpaste to get a nice, pliable texture to the paste. I built the chair first then added Frank's throws over the back and side of the chair. I then made Franks body seated in the chair and dressed him in a green suit and white shirt. For the head and hands I tinted some white colour paste to give it a flesh tone and placed some wire glasses on his nose and the TV remote in his hand. Royal icing gave Frank a moustache and hair. The slippers were sprayed with edible gold spray paste but attaching them was tricky as the kept falling off so I had to stick some wire into Frank's legs and pin the slippers on! 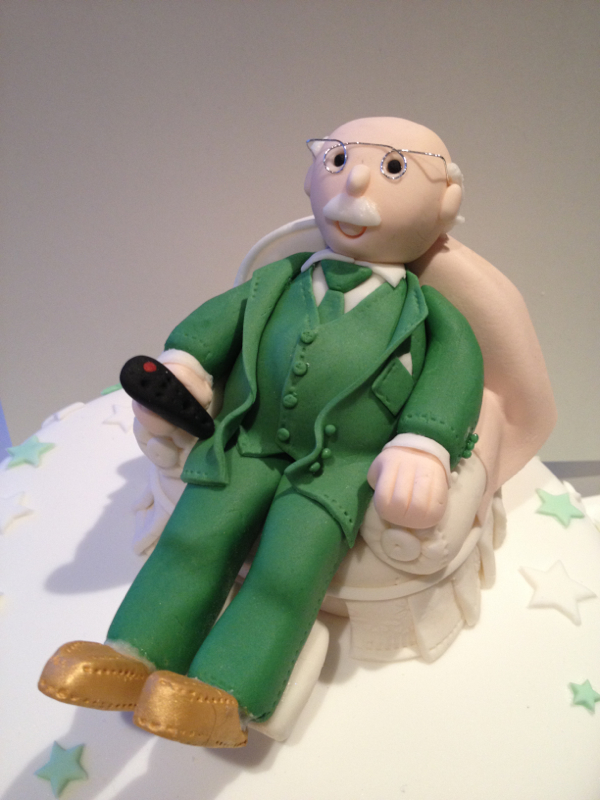 For the main cake I stacked up vanilla sponge with buttercream and jam then covered in white fondant. Green fondant stars decorated the cake with the colours fading as they moved up the cake towards Frank. The iced board featured 'Happy 66th Birthday' written on stars and a green ribbon finished the design. 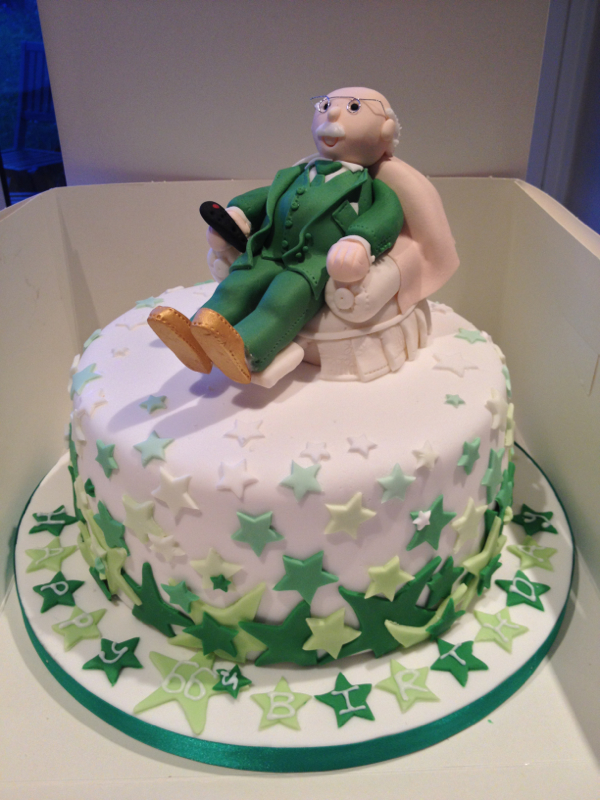 Watch this space for pictures of Frank with Frank!
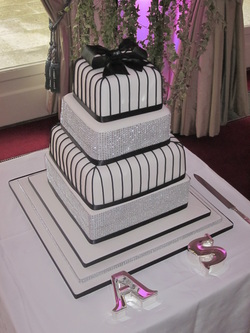 Sally & Anthony's wedding cake was my biggest challenge yet. Lots of research had gone into the design over the past few weeks and I decided the black, white sparkly square cake needed to be a real show stopper to match their classy art deco reception theme. Getting really square corners was important to me as so many square cakes you see on the internet are actually polystyrene dummies which give you perfect corners, so people expect to see this with the real cakes too. The main problem i had was the cakes were rising in the middle but the corners were cooking too quickly in the tin and not rising. I then had to level the cakes to get the perfect square corners which meant wasting loads of cake. I did some internet research and discovered that wrapping the baking tins in damp toweling can help the tin stay cool and allow the corners to rise up. This meant i had less cake wastage and I was able to bake the tiers faster. 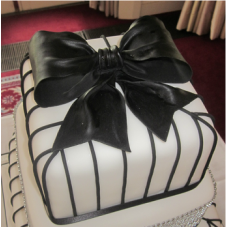 For impact i made each tier 4 inches deep and to give extra height i made a 3 tiered iced base so with the bow topper the cake stood at nearly 20 inches tall. To give the cake sparkle Anthony's Mum Carol had found some cake 'bling' which came on a roll. I wrapped this full height around 2 of the tiers and when the light hit the cake it sparked and shined. The other 2 tiers were decorated with thin icing stripes. Instead of piping black icing onto the white cake (a disaster waiting to happen!) i made the stripes by mixing 1:1 black sugarpaste and black flowerpaste. I pressed the icing through a sugarpaste gun which gave me neat stripes to attach by hand to the cake an inch apart.  To top the cake off i made a large black bow from black flowerpaste. When it dried the colour was a bit dull so i painted it with black food colouring to deepen the black and give it a slight sheen. Thin black ribbons around the base of each tier and alternating black and bling edging to the cake stand finished the design. I was so pleased with the result. It complemented Sally's beautiful fishtail dress and the ornate surroundings of the RAC club in Epsom Huge congratulations Sally and Anthony, you both looked stunning and so happy. And thank you for trusting me with making your cake! 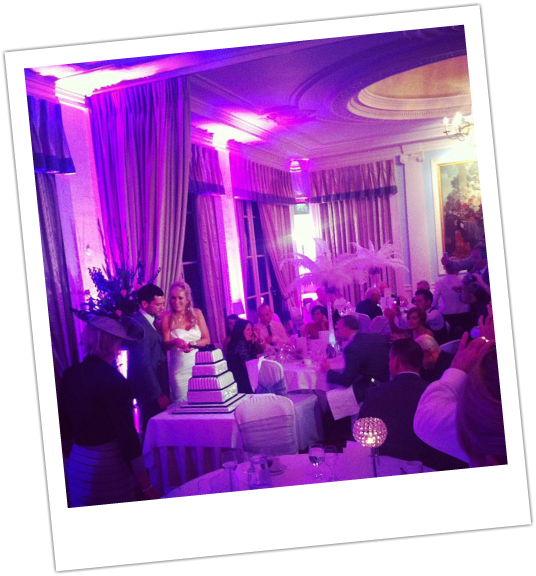 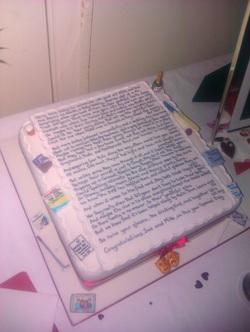 We recently attended a Ruby wedding anniversary surprise party and the cake was very unusual.
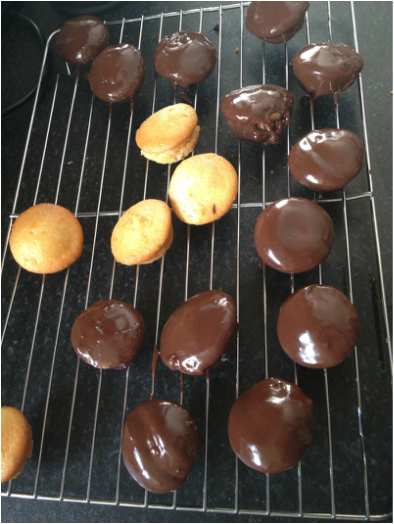
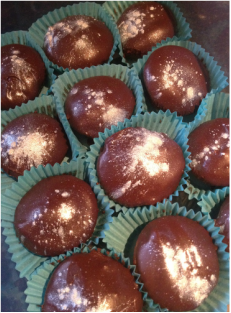
On a large icing tablet a poem had been wirtten in edible pens charting the life of the couple across their 40 years of marriage. The tablet was then attached to the top of the cake surrounded by little icing objects from their past. Such a personal touch for a special anniversary I am off for a girly night with my NCT friends tonight and i have just whipped up some mini sponges dipped in ganache to take along with me. Here is a picture of them mid production. Once the ganache had firmed up I popped them into mini cupcake cases and sprinkled with silver shimmer dust to finish them off. I hope the girls enjoy!
|
About AmyMum. Wife. Artist. Baker. Archives
November 2013
Categories
All
 |

 RSS Feed
